Replaces


This part doesn’t fit a . Select from parts that fit.
Frequently bought together
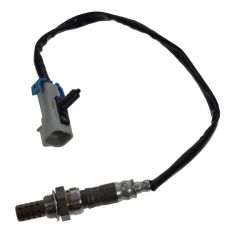
Part Details
Install Tip: You may be required to reset the vehicle computer after installation of this part.
Direct Fit Replacement - Guaranteed to fit and function for your specific application
Item Condition:
New
Attention California Customers:
 WARNING: This product can expose you to chemicals including Lead and Lead Compounds, which are known to the State of California to cause cancer, and birth defects or other reproductive harm. For more information, go to www.P65Warnings.ca.gov.
Lifetime Warranty
This item is backed by our limited lifetime warranty. In the event this item should fail due to manufacturing defects during intended use, we will replace the part free of charge. This warranty covers the cost of the part only.
Returns: Parts with electrical components cannot be returned once installed.
FREE Shipping is standard on Orders shipped to the lower 48 States (Contiguous United States). Standard shipping charges apply to Hawaii, Alaska and US Territories. Shipping is not available to Canada.
Expedited is available on checkout to the United States, excluding Alaska, Hawaii and US Territories as well as P.O. Boxes and APO/FPO/DPO addresses. Final shipping costs are available at checkout.


Created on:
Tools used
Hi, I'm Mike from 1A Auto. We've been selling auto parts for over 30 years. We're dedicated to delivering quality auto parts, expert customer service, fast and free shipping, all backed by our 100% satisfaction guarantee. Visit us at 1AAuto.com, your trusted source for quality auto parts.
Determining whether or not your vehicle is a California emissions or a federal emissions vehicle is pretty straightforward. To do this, you'll want to locate your catalyst sticker under the hood of your vehicle. It'll either be actually on the bottom side of the hood, most GM vehicles have it on the air box, and other vehicles may have it along your radiator support at the front of the engine bay.
All you need to do is see, "This vehicle conforms to California regulations." That means that this vehicle is a California emissions car. Just because you're not in California or are in California doesn't necessarily mean your vehicle will be one way or the other.
Now, our F150 has it down here on the radiator's support, right at the front of the engine bay and you can see here, "This vehicle conforms to US EPA regulations." This means that this vehicle is a federal emissions.
Now, here we have two things that are a little different. Our catalyst is located on the vehicle's air box and this vehicle conforms to US EPA regulations and California regulations. If it conforms to both federal and California emissions, it's considered a California emissions vehicle.
Thanks for watching. Visit us at 1AAuto.com for quality auto parts, fast and free shipping, and the best customer service in the industry.
Tools used
Brought to you by 1AAuto.com, your source for quality replacement parts and the best service on the Internet.
Hi, I'm Don from 1A Auto. I hope this how-to video helps you out, and next time you need parts for your vehicle, think of 1AAuto.com. Thanks.
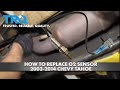
In this video, we're going to replace the upstream oxygen sensor. Now that's the one that's before the catalytic converter. It's between the motor and the catalytic converter. This is a 2007 G6 with the 4 cylinder motor, same as any G6 or Saturn Aura. The only tool you'll need is a 7/8 inch, oxygen sensor socket and a flexible headed ratchet will make the job easier.
Access your upstream oxygen sensor. It's right in behind the engine. This is a 2.4 liter, 4 cylinder. There's the oxygen sensor. There's the electrical connector. Now back in, there's a blue, little safety lanyard that you need to pull out. Then, there's just a tab on top of the connector, pull it up with your thumb and then you should be able to pull the connector right off. Now grab the other end, the end that's connected to the O2 sensor and pull it out of the clip. This is the tool that makes all the difference. It's an O2 socket. See it has a big slot in it that allows the electrical connector to go out to the side and then you put the socket around the oxygen sensor. A flexible headed ratchet like this is going to be your best bet, allows you to get the most leverage. Once you get the ratchet on there, turn the O2 sensor out and actually, this one comes out fairly easily once we get it started.
The new sensor goes in, just opposite of how the old one came out. Put it in place, get it in the hole and you can usually start it in by hand. Then, once you get it fairly tightened up, then make it nice and tight with the socket. Now, obviously, we need to reconnect the oxygen sensor. I'm just going a little fast, here, because doing it with one hand, makes it a little more difficult, but reconnect the connector. Make sure you put that locking clip back into place. Then clip the connector back into the bracket.
We hope this video helps you out. Brought to you by www.1AAuto.com, your source for quality replacement parts and the best service on the Internet. Please feel free to call us toll-free, 888-844-3393. We're the company that's here for you on the Internet and in person.
Tools used
Brought to you by 1AAuto.com, your source for quality replacement parts and the best service on the Internet.
Hi, I'm Mike from 1A Auto. I hope this how-to video helps you out, and next time you need parts for your vehicle, think of 1AAuto.com. Thanks.
In this video, we show you how to replace an O2 sensor on this 2011 Chevy Silverado 1500. It's the same part and a similar process on a large variety of GM models. The items you'll need is a new O2 sensor from 1AAuto.com, flat blade screwdriver, specialized 7/8 inch socket specialized for O2 sensors, ratchet, and possibly a piece of pipe for leverage.
We have the vehicle lifted. You don't actually have to do this, we just do this to make it easier to show you. Right here is your downstream O2 sensor, your catalytic converter, and your upstream O2 sensor. On the other side same thing: downstream, catalytic converter, and the upstream.
We're going to show you how to replace one of the upstream O2 sensor. Here's the 7/8 inch socket wrench, and you could use a 7/8 wrench but we recommend the socket. It will make it a lot easier.
Slide that special socket on there, attach a ratchet, and a piece of pipe for extra leverage. Once you break it free you can loosen it the rest of the way and remove it by hand. If you follow the harness from the O2 sensor you'll end up here. This will be a little bit hard to show some of this because there's not a lot of space to work there. Pry off the clip that holds this to the harness. You see that's freed.
Now, what you want to do is use a pair of pliers. You can also use your hands or a screwdriver. Pull that green pin out and then disconnect the harness. There's actually a little black clip that connects the harness. Pull that out of there. You may need a flat blade to help you pry it out.
Here's the new part up front, the old part in the back. You can see they're identical. The exact same part, all the same mounting points and everything. Feed your new O2 sensor up into place and twist it in. Fast-forward as he tightens that up. He does this at a slightly different order, but it's the same set of clips.
You want to first reconnect that wire to that harness there with that large clip. Take that little black clip and slide it into place on that bracket. Reconnect the harness and slide that green pin back into place. You're all set.
We hope this video helps you out. Brought to you by www.1AAuto.com, your source for quality replacement parts and the best service on the Internet. Please feel free to call us toll-free, 888-844-3393. We're the company that's here for you on the Internet and in person.
Tools used
Tools used
The O2 sensors are located right here on the exhaust. This one is in front of the converter. And then there's another one in front of this converter. These are the two upstream O2 sensors and then the downstream after the catalytic converter, there's one on the right side, and there's one on the left side. And the procedure to replace these is the same for all of those. Connector is right there, there may be a lock on the connector, you might have to pull that out and then just disconnect the connector, just like that. Then there's a retainer that holds the connector on, just use a trim tool and take that retainer off. Or you might have to cut it, the new one has one. I'll just cut this one off. And just pull that through. And take a 7/8 wrench or you can use a O2 sensor-specific wrench or even a socket and loosen it up, and just loosen that up. And take that out. I'll take the new O2 sensor and get it started. Start it by hand. Then you can tighten this O2 sensor. And do the best you can, if you can fit a torque wrench in there, you wanna tighten that to 31 foot-pounds. And resecure the connector into the retainer. And connect the connector. And then if you have that lock, put that lock through, and then you can do the same with the other O2 sensors.