Replaces
This part doesn’t fit a . Select from parts that fit.
Frequently bought together
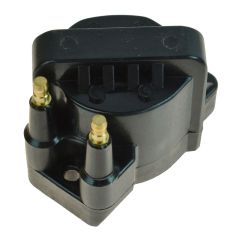
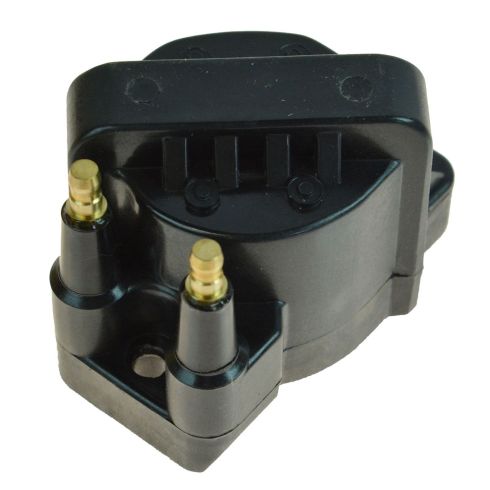
Part Details
TRQ ignition coils will have your engine running like new. TRQ ignition coils are manufactured to precise specifications using premium raw materials to optimize each vehicle's ignition system. To ensure peak performance, TRQ recommends replacing ignition coils in sets to prevent electrical output imbalances. All products are fit and road-tested in our Massachusetts R&D facility to ensure we deliver on our promise of Trusted Reliable Quality.
Product Features
Item Condition:
New
Attention California Customers:
 WARNING: This product can expose you to chemicals including Lead and Lead Compounds, which are known to the State of California to cause cancer, and birth defects or other reproductive harm. For more information, go to www.P65Warnings.ca.gov.
Lifetime Warranty
This item is backed by our limited lifetime warranty. In the event that this item should fail due to manufacturing defects during intended use, we will replace the part free of charge. This warranty covers the cost of the part only.
Returns: Parts with electrical components cannot be returned once installed.
FREE Shipping is standard on Orders shipped to the lower 48 States (Contiguous United States). Standard shipping charges apply to Hawaii, Alaska and US Territories. Shipping is not available to Canada.
Expedited is available on checkout to the United States, excluding Alaska, Hawaii and US Territories as well as P.O. Boxes and APO/FPO/DPO addresses. Final shipping costs are available at checkout.


Created on:
Tools used
Brought to you by 1AAuto.com, your source for quality replacement parts and the best service on the Internet.
In this video, we're going to show you how to replace an ignition coil on this 2003 Buick LeSabre. These coils are the same for many different GM vehicles, so this will cross over to different cars, although some vehicles locate the coils in different places. The only tool you'll need is a 7/32 inch socket with a ratchet and extension.
The ignition coils for this vehicle are nicely located right here on the front the engine. There's actually nothing wrong with them. I'm just going to show you how to take them in and out. Each coil does 2 cylinders. Just give the wires a twist. I'll put that one right up there; this one down here so I know which one goes where. Do these one at a time. These bolts are 7/32 inch and you just remove 2 bolts. The coil lifts right up and off. There are two contacts right here that go into the coil and then put your new one on. Carefully place it on those contacts. Make sure you don't bend them. Put your 7/32 inch bolts back in. Then plug back in your wires. The wires have to go back on the same ones, so it's important you do them one at a time and unplug the wires two at a time.
We hope this helps you out. Brought to you by www.1AAuto.com, your source for quality replacement parts and the best service on the Internet. Please feel free to call us toll-free, 888-844-3393. We're the company that's here for you on the Internet and in person.
Tools used
Brought to you by 1AAuto.com, your source for quality replacement parts and the best service on the Internet.
Hi, I'm Mike from 1A Auto. I hope this how-to video helps you out, and next time you need parts for your vehicle, think of 1AAuto.com. Thanks.
In this video, we're going to show you how to remove and replace the engine ignition coils on this 2000 Buick LeSabre, same as a 2000 to 2005 LeSabre, and pretty much the same as a lot of vehicles that have the 3800 Series V6. The only tool you'll need is a 7/32"� socket with a ratchet and extension.
The ignition coils on the 3800 V6 in this Buick LeSabre is very conveniently located right here on top. When one of these starts going bad, usually what it does is it will turn the check engine light on and it will say something like misfire in cylinder number 6 or 5 or 4 or something. That's generally a good indicator that your coil is starting to go bad. If that is the case, they're pretty easy to replace. You can see that the original coils are marked here with their cylinder numbers. We know that this plug is cylinder number 3. This wire goes to cylinder number 6.What you first want to do is get these plugs kind of a twist, and then pull off. Give this wire a little bit of a twist and then pull it up and off. Then, there's two 7/32"� bolts. Remove those. We'll just speed it up here as we remove those two bolts. Once you have those off, just pull the coil straight off.
Here's the new coil from 1AAuto. Right here, there are a couple of tabs or those are actually electrical connections and they go in right there. You want to carefully equip this right now. What you can do actually is put your screw in. Make sure that goes in and then put the coil down carefully onto those tabs. It basically plugs right in just like that. Then put another screw right down in.
We'll speed things up again here as we just put those two bolts in and tighten them up. Again, tighten them nice and firm. You don't want to over tighten them, though. This was the top plug wire and then the bottom plug wire. Because the replacement coil can fit anyone of these positions, they don't come marked with the serial numbers but you could take a crayon or some type of white paint marker and mark your cylinder numbers back on there using the old ones if you wanted to.
A suggestion would be if one of your coils goes bad, obviously at 1AAuto, we sell the coils so you can buy all three. I would also replace your plug wires and your spark plugs. That's kind of a way you do a basic tuneup on these newer engines is replacing the coils, plug wires, and spark plugs.
We hope this video helps you out. Brought to you by www.1AAuto.com, your source for quality replacement parts and the best service on the Internet. Please feel free to call us toll-free, 888-844-3393. We're the company that's here for you on the Internet and in person.
Tools used
Tools used
Brought to you by 1AAuto.com, your source for quality replacement parts and the best service on the Internet.
Hi, I'm Don from 1A Auto. I hope this how-to video helps you out, and the next time you need a part for your vehicle, think of 1AAuto.com. Thanks.
In this video we're going to replace the ignition coils. We're going to do one of the coils; the second coil is basically the same procedure. All you're going to need is a 7/32 socket with a ratchet, and maybe an extension.
The coils are on the side of the engine. The original ones are marked one and four on that front one. Then you see there are the One Cylinder, Two Cylinder, Three Cylinder, and Four Cylinder. You follow that Four Cylinder wire right to the coil, and it's hooked to the four post. It's very important when you replace your coils, obviously, that you plug the spark plug wires back in correctly.
We do two things. We only replace one coil at a time, and as we take the coil off, we put the wires onto the new coil. The other thing you can do as well is you can just mark the new coil with a paint marker with the same markings as the original. As you saw before, the cylinders are one, two, three, and four from left to right. Make sure you plug them in correctly to the new coils.
The coils are held in by two bolts. You can see one right at top, and then the other one from the other coil if you unplug that lead there. There's the other one, and then there's the bottom screws that are directly opposite of the top ones. You can see here, Don goes for the bottom bolt first, and that's a 7/32 socket with a ratchet. You will need a socket and ratchet to do this. It really is pretty much impossible to get to the bottom bolts with a wrench. So he removes that bottom bolt first, and then he'll turn his attention to the top bolt. Now, with the bolts undone, take the coil out, and then Don removes the two bolts from the coil. Put those aside.
Here's the new coil from 1A Auto, it's exactly the same as the old one. Now, what Don will do, is he'll take and remove one of the plug wires, and just plug it right into the new coil. Then he'll take the other plug wire, unplug it from the old one, and plug it right into the new coil. That way he doesn't have to worry about remembering which one goes where. There are two tabs on the coil base. They line up in the coil. Just be careful that you don't bend those tabs. Get the new coil in place and plugged in. Then reinstall the bolts.
We hope this video helps you out. Brought to you by www.1AAuto.com, your source for quality replacement parts and the best service on the Internet. Please feel free to call us toll-free, 888-844-3393. We're the company that's here for you on the Internet and in person.
Tools used
Brought to you by 1AAuto.com, your source for quality replacement parts and the best service on the Internet.
Hi, I'm Don from 1A Auto. I hope this how-to video helps you out, and next time you need parts for your vehicle, think of 1AAuto.com. Thanks.
In this video we're going to show you how to replace an ignition coil in a '97 Buick LeSabre. It's going to be the same operation for '97 through '99. You're going to need a 7/32"� inch socket and socket wrench and a new coil from 1A Auto.
The LeSabre has three ignition coils located on the top front of the engine. I'm using a 7/32"� socket and socket wrench to remove two screws that hold it in. As you remove the coil and take your spark plug wires off, just remember which one goes to the left post and which one goes to the right post.
Here you see the old part, and the new part from 1A Auto, which is identical, and will go in exactly the same way. Start by plugging in your wires. Seat it down, be careful not to bend these two connectors. Here I'm just re-installing those 7/32"� bolts. Just note that the procedure is the same for all three coils.
We hope this video helps you out. Brought to you by www.1AAuto.com, your source for quality replacement parts and the best service on the Internet. Please feel free to call us toll-free, 888-844-3393. We're the company that's here for you on the Internet and in person.
Tools used
Tools used
Brought to you by 1AAuto.com, your source for quality replacement parts and the best service on the Internet.
Hi, I'm Mike from 1A Auto. I hope this how-to video helps you out, and next time you need parts for your vehicle, think of 1AAuto.com. Thanks.
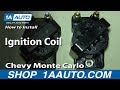
In this video, we're going to show you how to replace an ignition coil on this 2003 Chevy Monte Carlo with the 3.4 liter V6 engine. The only items you'll need is a new ignition coil from 1AAuto.com, a 7/32 inch socket, and ratchet.
On these V6 engines, you have three ignition coils back here and you want to mark the wires with a separate marking on the two attached to the ignition coil. You're going to remove and then disconnect those two wires. These markings will just help remind you where they were, and then you want to remove this 7/32 and this 7/32 bolt.
Once you remove those bolts, you want to just lift it up carefully off of the prongs and then pull it free. On the left is the old ignition coil; on the right is the new one from 1A Auto. You can see they're identical, and they'll fit exactly the same. Take your new ignition coil, and we mark the numbers on it so I've matched our old one. You want to put those slots down onto those prongs right there, so carefully lower it down onto those prongs and then tighten up those bolts. Now, reconnect your spark plug wires, making sure you're putting them in the right spot, and then you're all set.
We hope this video helps you out. Brought to you by www.1AAuto.com, your source for quality replacement parts and the best service on the Internet. Please feel free to call us toll-free, 888-844-3393. We're the company that's here for you on the Internet and in person.