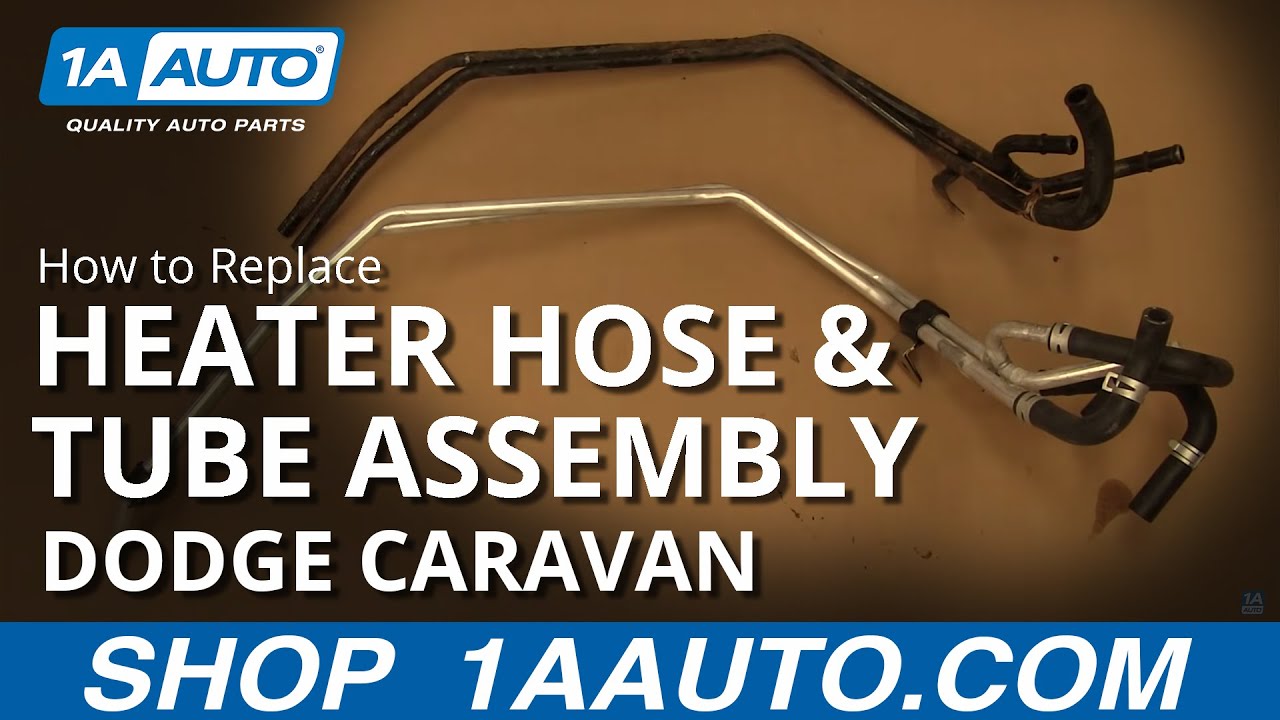
How to Replace Heater Hose Tube Assembly 2001-05 Dodge Grand Caravan
Created on: 2015-03-18
Check out this video to learn how you can replace the heater hose and tube assembly on your 01-10 Dodge Grand Caravan.
-
step 1 :Draining the Coolant
- Have a drain pan ready
- Insert a tube to the drain
- Turn the valve a quarter turn counterclockwise to remove it
- Let the coolant drain
- Remove the radiator cap to speed up the process
-
step 2 :Removing the Wheel
- Loosen the 21mm lug nuts with the vehicle on the ground
- Raise the vehicle with a floor jack
- Secure the vehicle on jack stands
- Remove the lug nuts
- Pull off the wheel
-
step 3 :Removing the Inner Wheel Well Panels
- Pull off the four pins in the wheel well with a flat blade screwdriver and a pair of pliers
- Remove the two Phillips screws on the edge of the bumper cover
- Remove the inner wheel well
- Pull down the second panel to remove the pins
-
step 4 :Removing the Air Intake
- Remove the 10mm bolt from the air box
- Disconnect the relief hose
- Pry out the red safety clip from the air flow sensor with a flat blade screwdriver
- Disconnect the air flow sensor harness
- Loosen the hose clamp holding the intake tube to the throttle body
- Pull up the air box
- Remove the hose from the throttle body
- Undo the clamps on the air box top
- Remove the air box top
- Remove the air filter
- Push the box to remove the clip on the side
- Remove the air box
-
step 5 :Removing the Engine Mount
- Jack underneath the engine for support
- Remove the three 15mm bolts from the engine mount
- Lower the engine a little with the jack
-
step 6 :Disconnecting the Engine Side Tubes
- Disconnect the hose clamps leading to the heat tubes with a pair of pliers
- Avoid disconnecting the clamps closer to the firewall that connect to the heater core
- Remove the 10mm nut from the heat tube bracket
- Have a drain pan ready
- Disconnect tubes from the radiator hoses
-
step 7 :Removing the Rear Heat Tubes
- Remove the two 8mm screws holding the throttle cable
- Disconnect the cables from the throttle body
- Loosen the clamp on the power steering reservoir hose, but leave the hose on
- Pull the heat tubes up and forward
- Rotate them clockwise and maneuver them out from behind the engine
-
step 8 :Installing the Rear Heat Tubes
- Insert the lower end behind the engine first
- Maneuver the heat tubes down into place
- Preliminarily tighten the bolt to the brace on the heat tube
- Tighten the 10mm nut to the bracket on the firewall
-
step 9 :Connecting the Engine Side Tubes
- Insert the new clips onto the hoses
- Reconnect all of the hoses to the heat lines
- Connect the cables to the throttle body
- Tighten the two 8mm bolts to the throttle body bracket
-
step 10 :Reinstalling the Engine Mount
- Jack up the engine
- Tighten the three 15mm bolts to the engine mount
-
step 11 :Reinstalling the Air Intake
- Insert the air box into place
- Tighten the 10mm bolt to the air box
- Insert the air box cover into place
- Clasp the clamps to the air box cover
- Connect the mass air flow sensor
- Plug in the safety clip to the sensor
- Connect the relief hose
- Tighten the air intake hose clamp with a flat blade screwdriver
- Remove the jack to lower the engine
-
step 12 :Tightening the Radiator Hoses
- Clip the remaining hoses to the heater lines
- Slide the clamps in place
- Tighten the 10mm bolt to the bracket
-
step 13 :Installing the Inner Wheel Well Panels
- Push the inside panel into place and replace the clips
- Push the wheel well panel into place and replace the four clips
- Tighten the two Phillip screws to the edge of the bumper cover
-
step 14 :Reattaching the Wheel
- Slide the wheel into place
- Start the 21mm lug nuts by hand
- Tighten the lug nuts preliminarily
- Lower the vehicle to the ground
- Tighten the lug nuts to 100 foot-pounds in a crossing or star pattern
-
step 15 :Refilling the Coolant
- Push the radiator drain in a quarter of a turn to a vertical position
- Turn the plug 90 degrees with pliers to close the valve
- Refill the radiator with the correct 50/50 mixture until the radiator is topped off
- Tighten the radiator cap
- Refill the coolant reservoir to the max fill line
-
step 16 :Testing the Coolant
- Start the vehicle
- Circulate the coolant by turning on the front and rear heat
- Check the coolant level after 10 minutes of driving
- For the first few days of driving, check to make sure the coolant level is between the max/min fill line
Tools needed
-
Socket Extensions
Flat Blade Screwdriver
Torque Wrench
Phillips Head Screwdriver
Jack Stands
Drain Pan
Rubber Vacuum Hose
Ratchet
Floor Jack
Needle nose pliers
Anti-Freeze
Complete Metric Socket Set
Brought to you by 1AAuto.com, your source for quality replacement parts and the best service on the Internet.
Hi, I'm Mike from 1A Auto. I hope this how-to video helps you out, and next time you need parts for your vehicle, think of 1AAuto.com. Thanks!
In this video, we're going to replace the rear heating tubes on this 2003 Caravan. It's the same as a lot of these Caravans and Town & Country's, they often rust out in the back where they connect to the hoses, and we'll show you how that works. You'll need a new tube assembly from 1AAuto.com, pliers, catch pan, Phillips screwdriver, various millimeter sockets with a ratchet and extension, maybe something bigger for some extra leverage, jack and jack stands, and some extra coolant to refill.
You want to start by draining the radiator fluid, or the coolant. Under the driver's side, if you look up under the side of your radiator, you'll see there's a drain here. I'm going to connect a tube just to help direct coolant. If you can turn it with your fingers, do it. If not, use pliers. You want to turn the valve, which is like a square, a quarter turn counter-clockwise to pull it out. Obviously, have a drain pan underneath and let the coolant drain until it stops. Once you've started the coolant, you can actually open up the radiator cap, and that will allow it to drain even faster.
Remove the passenger side front tire. If you don't have air tools, start with the vehicle on the ground, loosen the lug nuts, then raise and support the vehicle on jack stands. Remove the wheel and tire the rest of the way.
There are four large push-style pins. You grab the inner wheel well and pull out. You can see I'm trying to pull out that top pin there, you can possibly use a large screwdriver, go in underneath and dislodge those pins. There's another two a little over to the right, and there's one up above as well. A pair of needle-nose pliers can be helpful to get these out as well. I remove the two Phillips screws that are right on the outside of the wheel opening. Then pull the inner wheel well over to the side and back down out of your way. Then, this inner shield is held with two pins right up top, I just pull it straight down to get those pins out.
We're going to remove the air box. There's a 10 millimeter bolt right here, remove that. Use a screwdriver and pry up on the relief hose, pull it off. Then the air flow sensor plugs in the back. There's a little red safety clip that you pry out with a screwdriver, you can see it there, and then press the tab and disconnect the airflow sensor. Then loosen up this hose clamp that holds that intake tube onto the throttle body. Now you can pull up on the whole air box, and then pull the intake tube from the throttle body. There is another pin holding it to the side. I open up the box, just undo the clamps, there's a clamp on the side, and a clamp on the back. You can take the top of the air cleaner box off and pull the air cleaner out. Then I realize that there's a little clamp on the side, twist it to the side, and then you can pull the box up and out.
Okay, one of the cushions stays on the stud, so I just take it off the stud and push it back on to the air box. Support your engine with a jack. Again, you're not trying to lift your car up with the engine, you're just supporting it. Then you want to remove these three 15 millimeter bolts. I'll fast-forward here as I remove those bolts. You'll see as I remove the third one, the weight of the engine actually comes off of the mount and it kind of comes up a little bit. Then, once you remove those, you actually want to let the engine down and give yourself some more room at the top, but still support it with the jack a little bit.
Now you're going to disconnect the engine side of the assembly. You're going to disconnect three of the hoses that go to the assembly or to the tubes themselves. You can see the red arrows. You want to disconnect the clamps from those hoses and those tubes. Then there's another red arrow that goes down towards the bottom, there's a tube that goes down, that feeds the engine, you want to disconnect those. You want to avoid disconnecting the two on the top because those go to your heater core and if you try to disconnect them you could damage the heater core. So, if possible, avoid disconnecting those.
Okay, I'll show you one here. I'm not going to show you all of them, but you reach back in there with pliers, and some of them are a little difficult to get to, but if you've lowered your engine down, you should have enough room. Get the pliers onto the teeth of the clamps and then squeeze down and pull the clamps back. I'm basically twisting the hose, and you hear that crack right there. I broke the hose free from the metal and then just pulled the hose off.
Then go to the next one. Just to give you an idea of what I'm doing here, again, take your pliers I'm just showing you on the assembly that's outside the car squeeze the teeth on the clamp and then move the clamp off the hose. Then, with your hands, if you can, you can loosen up the hose, if you need to, use a screwdriver, and put it between the hose and the tube to help break it loose. Then you can pull it apart. Once you have all of the hoses disconnected use a 10 millimeter deep socket and ratchet, and remove the nut that holds the bracket onto the body.
Now, underneath where the passengers feet are, the tubes connect into hoses, so you, again, squeeze the tabs on the clamps, move them back down the hose, and then you can grab hold of the hoses with the pliers. Break them free from the tube. Obviously, have a drip pan underneath, and you are going to get some more coolant coming out when you disconnect these, as you'll see.
Back up top, you'll need an 8 millimeter socket and ratchet with an extension, or an 8 millimeter wrench would work. There are two 8 millimeter screws that hold the throttle cable in place. You remove those two screws, and then you pull the throttle cables down and around to disconnect them from the throttle body. Now use a pair of pliers to disconnect the hose that comes from the power steering reservoir and pull the clamp off, but leave the hose connected. Only disconnect it when you go to pull the tubes out, because you will get power steering fluid that comes out of there. Then as soon as you get the tubes cleared, reconnect the hose.
Now you're going to pull your tubes out. Pull them up and forward and kind of rotate them. Let's see, I guess that would be clockwise slightly. They'll start to get hung up a bit on your engine coil, and if you haven't taken them off that power steering hose, they'll get caught up in there. You just give them a little force, pull them out some, it doesn't matter if you bend them. Okay, they come out, just make sure they don't get hung up on anything.
Okay on the top are my old ones; bottom are the new ones. You can see the old ones had already rusted out once and somebody had cut them off and put longer rubber hoses on. A couple of the hoses I left in the car, so I'm just taking the new hoses off of the new assembly, and I'm just going to hook the new assembly onto the existing hoses because they seem to be in good shape.
Okay, inserting the new hose assembly can be an exercise in a little bit of patience. Get the lower end down in first, and you actually almost have the assembly upside down, and then you just kind of keep working it. Force the bottom end of the assembly to the left a little bit and keep working the assembly past the engine. You can see I just keep motioning back and forth, and persuading it a little bit. I am using some force. I'm bending the tubes slightly, just to get them past things. At the same time you're rotating it in a counterclockwise motion. Eventually it will go down in there. There's a bracket that bolts into the brace. The bolt was still there, so I'm removing the bolt and then I'm going to re-bolt that brace or that bracket in. I'm just going to do it loosely for now. On the top side, I'm going to get that bracket in place and put that 10 millimeter nut back on. I'll just fast-forward here as I tighten that up.
I'm going to make sure I use the new clips as much as possible. I put those on the hoses, and then I'll fast-forward, and you'll just have to trust me here that I reconnect all those upper hoses. Here I'm going to reconnect the hose for the power steering, as well as reconnect the throttle cables. You basically pull them around, you slide the tabs in, and then pull them back around, and then bolt down the bracket.
Okay, now you want to jack the engine back up somewhat into place. Now, I'm going to put the three bolts back in place and it actually helps if you loosen up the two bolts that hold the mount to the vehicle. This lets you move the motor mount around a little bit and get those started in. I'll fast-forward here as I tighten them up. I tighten them up with the air tools a little bit, but then I make the final tightening with the hand ratchet.
Put the air box back in place. There was actually a clip on the harness that I had taken off, so I just re-secure that, then push the air box back in place, and secure it with that 10 millimeter bolt. Then put the lid back in place. You push it in and then lock the clips back on. Be careful, I did get the wiper washer hose jammed in there a little bit, that's why I'm having a little bit of trouble with it. Once I got the hose out of the way, then it went together fine. Make sure you plug in the mass air flow sensor and put that safety clip back in. Put the breather hose back on and tighten up the clamp.
Then you can remove the jack. Now, back up underneath, I'm going to put a couple new clips onto the hoses down here and then get them onto the new tube assembly. Once they're on there, I'll set the clamps in place and then tighten up that 10 millimeter bolt that holds that bracket. I'm going to fast-forward a little bit.
Put that lower cover back in place. It has the two pins that are kind of up in there, you've just got to feel your way in there. Set those pins and get that in place. Now flip the inner fender back in and set it in place. Then put those three pins in place to hold it. Then reinsert the two screws that hold the wheel well to the fender or the bumper cover.
Reinstall your wheel and tire. If you put the two lug nuts on that are opposite the Schrader valve or the fill valve, then you can pop your hubcap on if you have hubcaps, and then put on all the rest of the lug nuts. Then you can let your vehicle down. You want to make sure you torque your lug nuts to 100 foot-pounds.
Now you want to make sure that you reset your radiator drain. Make sure you push it in. It should push in, and then turn a quarter of a turn from the horizontal position to the straight up and down position. We pushed it in, and then we needed pliers to turn it the 90 degrees to get it to close. Now you've drained your coolant system totally, so you want to refill it with the correct 50/50 mixture. You're going to fill the radiator directly. You fill it, you'll see it come to the top, and then it will go down some, and then fill it again until you top off the radiator. Then replace and secure your radiator cap.
Then you're going to want to fill the coolant reservoir. It's over near the battery, and you basically want to fill it to the max-fill line.
Then you're going to want to start your vehicle up and check for any leaks. Get it to idle, get the thing up to temperature, and make sure there's no coolant dripping anywhere. You'll see, just in a second, as I finish up, we'll draw a little line for you. There is a mark on the bottle, but I also drew a little line for you there digitally. That's basically the max-fill line. You start your vehicle up, get the coolant to circulating. This vehicle has rear air, you want to make sure you turn on your front heat and your rear heat as well. That'll help get coolant circulated to those portions of the heating system.
Start it up. Monitor your coolant in your coolant tank. Drive it for about ten minutes. You'll notice that probably the heat doesn't work right away, it will take a little while for the heat to work, but just check your coolant after the first ten minutes of driving. Drive it again for another ten minutes. For the first few days that you drive the car, just check that coolant tank and make sure you're always between the minimum and the maximum.
Thanks for tuning in. We hope this video helped you out. Next time you need parts for your car, please visit 1AAuto.com. Also check out our other helpful how-to and diagnosis videos.

How to Replace Heater Hose Assembly 2009-2020 Dodge Journey
This video shows you how to install a new TRQ heater hose assembly in your 2009-2020 Dodge Journey

