
How To Install Replace Window Motor GMC Sierra 1999-2006 1A Auto
Created on: 2010-02-03
Watch this video to learn how to fix a slow or stuck window. The experts at 1A Auto will show you how to replace the window motor in your 99-06 Chevy Silverado or GMC Sierra; or 00-06 Chevy Tahoe or GMC Yukon.
-
step 1 :Remove door panel.
- Pry out the door lock button.
- Remove the mirror panel using your putty knife and cloth.
- Remove the door handle trim plate.
- Remove the pushpin and the no. 2 torx screw.
- Remove the 7mm bolts.
- Remove the panel and the door handle linkage and the wire harness.
- Remove the door handle.
-
step 2 :Remove water shield.
- Carefully use your putty knife to remove the water shield.
- Take care not to rip it, as it keeps water from getting into your door.
- Remove the switch panel from your door panel
-
step 3 :Unbolt Regulator
- Unclip the two clips attaching the regulator to the window.
- Lift up the window and tape it up out of the way.
- Remove the bolts with your 10mm socket and ratchet.
- Take out the motor first and then the regulator.
-
step 4 :Install the new regulator
- Attach the new regulator to the motor using the bolts that came with it.
- Replace the regulator and motor back into their original positions, regulator first.
- Bolt the track back in
-
step 5 :Test the window regulator
- Before reassembling, test the window mechanism.
- Once you have determined it works, un-tape and attach the window.
- Test again to make sure the window isn’t straining and everything works.
-
step 6 :Re-assemble the door panel
- Replace the water shield.
- Reassemble the door panel.
- For more detailed instructions refer to our other videos.
Tools needed
-
Flat Blade Screwdriver
Number 2 Torx driver
7mm Socket
Painter's Tape
10mm Socket
Door Panel Removal Tool
Ratchet
Needle nose pliers
This video is brought to you by www.1AAuto.com, your source for quality replacement parts and the best service on the internet.
Hi. My name is I'm Mike Green. I want to help you save time and money repairing your vehicle. I have 20-plus years experience restoring and repairing cars and trucks. My company, 1A Auto, sells high quality replacement parts over the internet. In this video, I will be showing you how to install these parts. By the end of this video, you do know how to install them and where to get them, that's going to save you time and money. Thank you and enjoy the video.
In this video, we'll be replacing a power window motor on this 2004 GMC Sierra. It's basically the same as any '99 to '06 Sierra and Silverado, Yukon, Escalade, all those trucks and SUVs. For this project, you'll need a medium flat bladed screwdriver, a pair of needle nose pliers, 7mm socket and driver, a Torx driver small size, number 2 actually and a 10mm socket and driver.
For this, we're actually going to due to YouTube 10-minute limit; we're going to speed up a lot of our stuff. First, it is the door panel. I'm going to go through that really quick for you. Pry out the door lock button. You remove the mirror panel and there are just two clips. You just use a screwdriver. I covered in a rag so I wouldn't scratch the paint. Then, the door handle trim plate. I just pry this out from the back, it comes off like that. Then, there's a small push pin, basically a plastic push pin. Start it with a screwdriver and then I use pliers to pull it out the rest of the way. There's a little tiny trim plate. Pull it off with your finger. Number two Torx screw, remove that quick.
I move real fast in this video. There's two other bolts, one right behind the lock right there. That's a 7 mm; remove that, and then another 7mm up under the door pull. Right there. Once those are removed, then the door panel basically lifts up and out, and then you're going to need to reach in behind, that's the courtesy light that I unplug there and then you need to unplug the power window switch and locks and everything. Actually it's also the mirror that plugs in there. This one is a little difficult. It's got a little lock tab and then that little grey lever actually pivots forward, so close up a bit and it comes out. You see me struggle here a little bit. Unplug it. There's one more on that master switch, and then unplug your speaker. Once the door panel is removed, now we remove the door handle. Pry that blue clip away and then use your fingers to rod then pulls up and out. 10mm bolt, take that off and then the handle slides forward and off. Now, you want to carefully remove your water shield. This keeps water from getting into your truck so carefully remove it and then put it aside so it doesn't get damaged.
Now, we want to remove the switch panel from the door panel so that the 7mm bolt that you remove under there. Then, you pry up and off with that panel. We're going to use this to control the window. If your window motor is broken that might not work but you'll see how we use it.
Now, I did create this video with obviously, a working window motor and door so humor me a little bit. You're really seeing how to take everything apart and put it together. If your window motor is not working, you're not going to be able to plug this in and move your window up and down. Hopefully, your window motor keeps working in the up position because that's the ideal position. If not, find the two clamps which I'll show you in a second. Wherever they are in the door, you loosen those and then slide the window up to the top and secure it, and then you can go from there.
The window regulator is held in by six bolts, one, two, three, and you can see the rail that was there. One, two, and that bolt actually holds in your window motor. What I'm doing is taping the window up right now. I used two pieces, I actually reinforce it with I think two more. I'm going through and then speed up the video here just taking out those 10mm bolts. Again, there are six of them. Again, you can just see my speedy hands here and actually, that's my father working one of his projects in the background in a nice plaid shirt. He's a little old school, installing a radio in a '74 Grandville.
Basically, what you would want to do is, now, I move the window regulator down so it's now free of the window. Now, I'm just finishing taking the window regulator out. Again, right now, I'm unplugging the window motor. Just has a little walking tab and then, removing the window regulator. You just kind of spin it. I think actually, if you take the whole thing and twist it, it'll come out easier. As you can see, it's like a two rail with cables, and then that comes out.
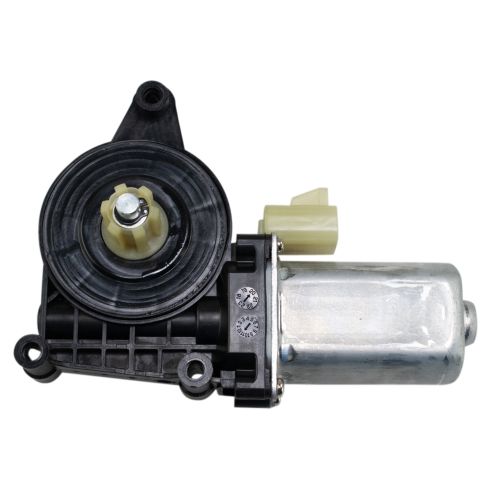
Here you'll see those are the three bolts that hold the power window motor to the regulator. You'll want to loosen those bolts up, and then I go to the bench here and you want to hold. There's a wheel inside, the black piece on top. You need to hold in place while you're pulling up off of the window motor. You can see I'm carefully holding it. There's that wheel inside, you want to make sure that stays in place. Once that's done, then your window motor is free. You can replace that if that's what you need to replace.
Now, I'm going to put it back together. I'm going to speed things up a little bit. There's the three bolts, put them back in again. YouTube only allows 10 minutes, so got to be quick on some of the stuff. Put the regulator back in spin it into place and you can hang up, I'll slow it down here. You actually hang the window regulator. There's a hole notch and the window regulator hang from there. You can start to bolt on that side, and it does hang on the other side. It takes a little messed up, old camera but it hangs on that side too. You start to bolt over there and then go bolt it all in.
Now, I'm working really fast here. Again, put in those six bolts in and you can see I'm using just like a screwdriver handle. If you get those in, you tighten them up basically as tight as you can. With that screwdriver handle, that's basically all you want, 15-20 ft. pounds, probably about 10 ft. pounds. Probably about 20-30 inch pounds of torque. Just tighten them up again; you can see me work it a little bit.
Now, slow it down and just going to run the obviously, plug the motor back in then I'm running the window regulator back up and just making sure that it meets the window correctly. Then, I'll tighten up those two clamps that clamp onto the window. Now, I'm taking the tape off and we'll do a test, making sure everything is going all right.
If you see anything that looks funny, run your other window up and down; make sure that it does the same. These windows do rotate forward a little bit so the back comes out away from the weather strip a little bit. It kind of look funny to me the first time I did it, but then I checked my driver side, it was the same way. After that, you restore your door handle and door panel and you're good to go.
This video is brought to you by www.1AAuto.com, your source for quality replacement parts and the best service on the internet. You can call us toll-free at 888-844-3393. We are the company that's there for you on the internet and in person. Thank you very much.
Shop Products


How to Replace Front Window Regulator Motor 2005-16 Toyota RAV4
Check out this video to learn how to replace the power window motor on your 05-16 Toyota RAV4. 1A Auto shows you how to do it yourself to save you money!

