
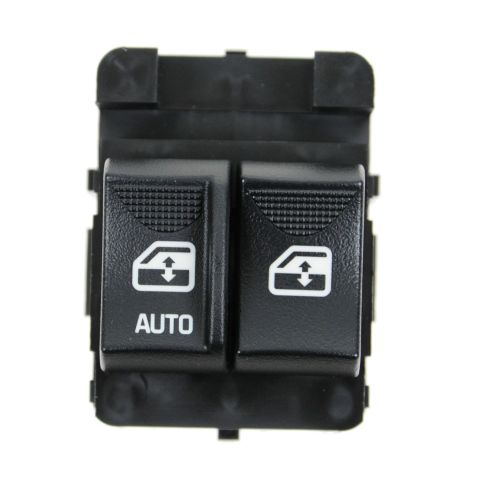
How to Replace Power Window Switch 2000-05 Chevy Monte Carlo
Created on: 2010-08-31
Find out easy replacing the power window switch can be on the 00-05 Chevy Monte Carlo with this how-to video
-
step 1 :Removing the Door Panel
- Remove the Phillips head screw from inside the door handle
- Remove the Phillips screw from the mirror base trim panel
- Remove the two T27 Torx screws from below the door pull
- Pull the door handle bezel off by hand
- Disconnect the lock switch wiring harness with a flat blade screwdriver
- Wrap a cloth rag around a putty knife to avoid scratching your paint
- Pry the door panel off with the putty knife
- Lift the door panel up and off
- Disconnect the window switch wiring harnesses with a flat blade screwdriver
-
step 2 :Removing the Window Switch
- Remove the three Phillips screws from the switch panel backing plate
- Remove the backing plate
- Remove the Phillips screw from the lower door pull bezel
- Pull out the lower door pull bezel
- Push the switch panel out of the door panel from the back side
- Loosen the thumb taps on the switch panel
- Pull the window switch out of the switch panel
-
step 3 :Installing the New Window Switch
- Push the window switch into the switch panel
- Push the switch panel into the door panel
- Put the lower door pull bezel into place
- Insert the Phillips screw into the lower door pull bezel
- Put the backing plate into place
- Insert the three Phillips screws into the backing plate
-
step 4 :Installing the New Door Panel
- Connect the window switch wiring harnesses
- Connect the lock switch wiring harness
- Put the door panel into place
- Push in the door panel clips
- Push on the door handle bezel
- Push on the mirror base trim panel
- Insert the Phillips screw into the mirror base panel
- Insert the two T27 Torx screws below the door pull
- Insert the Phillips screw into the door handle
- For more detailed instructions, please see the 2003 Malibu door panel replacement video
Tools needed
-
Putty Knife
T27 Torx Driver
Cloth Rags
Flat Blade Screwdriver
Phillips Head Screwdriver
Brought to you by 1AAuto.com, your source for quality replacement parts and the best service on the Internet.
Hi, I'm Mike Green. I'm one of the owners of 1A Auto. I want to help you save time and money repairing or maintaining your vehicle. I'm going to use my 20-plus years experience restoring and repairing cars and trucks like this to show you the correct way to install parts from 1AAuto.com. The right parts installed correctly: that's going to save you time and money. Thank you and enjoy the video.
In this video, I'm going to show you power window switch replacement on the driver side on this 2003 Monte Carlo, basically the same for any 2000 to 2007, although I believe the '06 and '07 switches were a little different style, but the procedure should be the same. Tools you'll need are Phillip's head screwdriver, T27 Torx driver, flat blade screwdriver and a putty knife and a rag.
To remove the door panel, first you remove four screws: one Phillips here, a Phillips here and then there's two T27 Torx screws right up in here. Now, that you've removed those screws, you can pull out on this panel and then forward and it comes off. Then for your switch, you use a regular flat blade screwdriver and pry out on one side and pull the switch out some and then pull the whole switch and pry the other side. Now, you want to use a putty knife and a rag or paper towel or something just to protect the paint, work it back in here and then work it up into there. Once you get them on, this panel kind of actually pulls free pretty easily. Just pull around the outside edge. Lift up. Then your door panel is off. You still have your mirror and your power window connected here. Now, looking from behind, it's real hard to shoot this, but basically you want to work with the tab in the back of your connectors here. You want to work your screwdriver right up in there. You're going to pull. I can show you that afterwards here. Basically, what you're doing is right here is where the tab goes in. You're just working your screwdriver around there and work it in there to release that tab. These connectors you can see right there, that's what you want to be pressing in. Now, your door panel is off.
Now, you have the door panel off. This is the back of it. You want to remove these three screws here and then that plate comes off. Now, looking at the face of your door panel, there's a screw that goes right up in here. You can see that, but it's basically from the bottom of the door panel up into the handle here. That releases this bottom bezel out. To get the switch panel out here, basically you want to start at the back. I'm pushing it up and in and then there's this set of ribs here that kind of get in the way, so you push those up through. Then you push these remaining locking tabs up through. Basically, most of your switches are now up and out. Pull it up. It pulls up and out like that.
Then once you have this assembly out, it's pretty easy. There's actually little thumb tabs here that you loosen up and you pull the switch out just a little bit. Then just use the screwdriver to help yourself a little bit and pull. Pull up on that tab and release it and there's your power window switch out.
You can see the new power window switch from 1A Auto is the same, just as nice. It has all the same detailing on it and everything. It's going to hook up the same and everything. And you can tell when there are switches going bad rather than a window mode or something because you'll start feeling it in the mechanism. You won't feel the clicking as well. Mostly what happens with these switches is the insides, the plastic inside breaks and you basically will find sometimes, your windows won't work and will work and that's usually a symptom of the switch, not something inside the door. This original switch is fine. Obviously, re-installation is pretty easy. It goes up in there like that, pushes .in and this, it's a little hairy. You kind of put the thing back together. Then you can see that this screw here. You've got to force it down a little bit and then once it goes, we're in good shape. I'm just pushing right here. It actually goes underneath. That's back in. You can screw this bezel on. The bezel goes like that in there. Start your Phillip's screw. The final step of the car window switch is put this bracket back on and just use the three screws.
With that back together, now you're ready to put the panel back on. Now, at this point, we're just going to fast forward through putting the door panel back on. You can probably pick up enough just by watching the fast motion or if you do want to see this in regular motion, just check out our other videos for the Monte Carlo door panel remove and replace and be on that. Once you put the door panel back on, make sure you test everything. Make sure your windows are all working, your door locks and mirrors and everything like that and we hope this helps you out. Test everything, window, mirror, door locks, everything is good.
We hope this video helps you out. Brought to you by www.1AAuto.com, your source for quality replacement parts and the best service on the Internet. Please feel free to call us toll-free, 888-844-3393. We're the company that's here for you on the Internet and in person.
Shop Products

How to Replace Master Window Switch 2002-06 Toyota Camry
How to repair, install, fix, change or replace a damaged, worn out, faulty or shorted power window switchon Toyota Camry, years 02, 03, 04, 05, and 06.

