
How To Replace Turn Signal Wiper Switch Chevy Suburban 1988-98 - PART 1
Created on: 2010-07-19
Watch this video to learn how to replace the turn signal lever on your 95-98 Chevy Silverado or GMC Sierra. The experts at 1A Auto will show you how to replace the stalk for your turn signals, wipers cruise control, and high beams.
-
step 1 :Disconnect the battery.
- Use an 8 mm wrench or a 5/16 wrench to disconnect the negative battery cable.
-
step 2 :Disable the airbag
- Open up the fuse box and look up the correct fuse on the label.
- Pull the airbag fuse.
-
step 3 :Remove the airbag
- Use a screwdriver to push into the slots on the back side of the airbag to release the airbag from the steering wheel.
- Unplug the wiring harness.
-
step 4 :Disconnect the horn
- Twist and pull to unplug the horn wiring.
-
step 5 :Remove the steering wheel.
- Remove the 21 mm bolt.
- Use a steering wheel puller to remove the steering wheel.
-
step 6 :Remove the lower panel
- Remove the four screws
- Pull off the cover
- Disconnect the air hose.
-
step 7 :Remove the steering column cover
- Using your driver, remove the two T25 Torx screws
- Unbolt the two 4 mm bolts securing the top cover and lift it up.
- Use your T25 Torx bit to remove the T25 Torx screw that anchors the switch to the column.
- In order to remove the second T25 screw using the driver and a 1/4 inch wrench to get under the loosened cover.
-
step 8 :Remove the plate under the steering column
- Remove the four 10mm bolts.
- Move the air hose out of the way.
-
step 9 :Remove the old switch
- Once you've got that plate off, then you want to pull this little piece of duct out of the way.
- Remove the red screw and the black screw that holds the connector in.
- Those are both 7-mm.
- Cut any of these wire ties that are tying that harness together.
- Use your screwdriver to disassemble the multi-function switch.
- Unplug the cruise control by removing the locking tab and then disconnecting it.
- Remove the old switch by carefully pulling it out of the electrical tape.
Cont'd in part two.
Tools needed
-
Socket Extensions
Flat Blade Screwdriver
1/4 Inch Wrench
8mm Socket
10mm Socket
Ratchet
5/16 Inch Socket
T25 Torx Driver
4mm Socket
Brought to you by 1AAuto.com, your source for quality replacement parts and the best service on the internet.
Hi, I'm Mike Green. I'm one of the owners of 1AAuto. I want to help you save time and money repairing and maintaining your vehicle. I'm going to use my 20 plus years experience restoring and repairing cars and trucks like this to show you the correct way to install parts from 1aauto.com. The right parts installed correctly, that's going to save you time and money. Thank you and enjoy the video.
Okay, so part one of two, replacing the multi-function switch on this 1999 Suburban, same as any 1995 to 1998 truck as well as 1999 to 2000 heavy trucks and 1995 to 1999 SUV. The tools you need are pretty basic, an 8-mm or 5/16 wrench to disconnect the battery, flat blade screwdriver, steering wheel puller. That is the one special tool you will need. Some millimeter sockets and ratchet and a T25 Torx bit and also something to cut some wire ties.
Disconnect your battery. You can see we've disconnected the positive battery cable here. That's an 8-mm or a 5/16 wrench. You want to disable the airbag by pulling the fuse, which on this truck it's #10, airbag, so you want to use your puller here and then pull out the #10 fuse. Okay, just a regular screw driver and there's slots right in behind if you feel with your finger. You just put the screwdriver into the slot. I just kind of work it a little bit and jiggle it. You can see the airbag comes up. Then inside there's the slot. Then your airbag comes off. You unplug the airbag. You pull this little locking tab out and just pull like that and your airbag is out.
Next, is your horn wires, which is this button here and just kind of twist it and pull on it and it comes out. So I'm removing this bolt. It's a 21-mm bolt. Now I'm going to put on a steering wheel puller. This is probably the one special tool you'll need in this project and it's usually a pretty inexpensive tool to buy. Okay so here I'm just threading in the bolts for the steering wheel puller. Then I'll grab my -I'm going to tighten them up a little bit, and then grab my 7 or 5/8 wrench and you will see me pull the steering wheel off. This is the best way to get the steering wheel off obviously.
Now you want to remove this lower panel and you have to remove four 7-mm screws, one here, one here, here, and then right under the parking brake release. After you remove those seven, you just kind of pull on it firmly and it does have some clips that hold it in. So let's disconnect this air hose here. It just pulls off. That goes down the other way enough. There are two T25 Torx screws; one is to the left of center of the column, one's right in the center. There are two holes on the one that is further away. Tilt the level will just pull right out, okay. It's just kind of pushed in. That comes down and now you need a 4-mm socket. There's a 4-mm bolt here and then if you go just up to the right you can look up in there and there is a 4-mm bolt right up in here and that allows this to come up enough. I'm going to switch to a T25 Torx bit again. There's a bolt right here that comes off that holds the switch to the column. Then this is a little tricky. I'm going to take this bit. I've got 1/4 inch wrench here. I'm going to use it like this and push it down into the screw. There's a screw on top here and it holds that switch on. You push it down in. Okay and here I have a ratcheting wrench but obviously you can just use a regular 1/4-inch wrench. Then you can reach in there and undo it with your hand. That way what you are going to want to do is remove this plate down here which is four 10-mm screws, one, two, three, and four.
Once you've got that plate off, then you want to pull this little piece of duct out of here. You are going to want to remove this red screw here and then this black screw over here that holds the connector in. Those are both 7-mm. You're also going to want to cut any of these wire ties that are tying that harness together. Okay so now once you have your connector down here what you want to do is just put your screwdriver into them and then the connectors for the multi-function switch actually slide forward and out.
Now we need to unplug the cruise control and it's this little clip right here. It's plugged in there kind of like this and then this locking tab is pushed in from the back side to lock it. So you have to pull this locking tab out first and then press and pull that out. Now that I have everything unplugged, there's kind of this conduit here that I can just pull apart like a big piece of electrical tape. I can carefully pull it apart. There's my old switch removed.
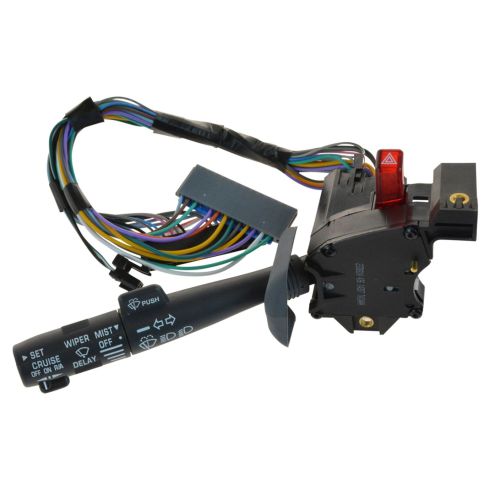
So here we are. Here's our original switch, our new switch from 1AAuto, obviously, it's got this little mesh on here. You see everything is the same. It's going to bolt up all the same. One thing they did try and do is you can see on our original here it would appear that you have a bigger harness for that brake switch. Actually I'm just going to pull it out and you can see we've got plenty of harness on the new switch.
Shop Products


How to Replace Combination Switch 2002-08 Dodge RAM 1500
This video shows you how to install a new combination switch on your 2002-2009 Dodge Ram 1500.

